Learn Next.js - Chapter 18: Docker Environment
If you went successfully through Vercel’s free and amazing Learn Next.js online course, you have end up in a nice and “fast” (the database access is actually slow, but that was on purpose for better understanding of the tutorial) Demo of a modern web application. You have also learned about plenty considerations when developing an web app. So now, you maybe feel like “How can I use all of this for a real project?”. Also there are still some constraints left like; “How can I get independent from Vercel’s nice but (in their free plan) slow hosting offer?”.
My tutorial here is supposed to be an extension to the course but you can also use it, since I share my code on Github, without going through Vercel’s course. At first we will “dockerize” our development area, then host our own database to finally be able to push all of that to a webserver of our choice.
Starting Point
At first let’s have a look how our setup looks like after we finished chapter 17 of the tutorial:
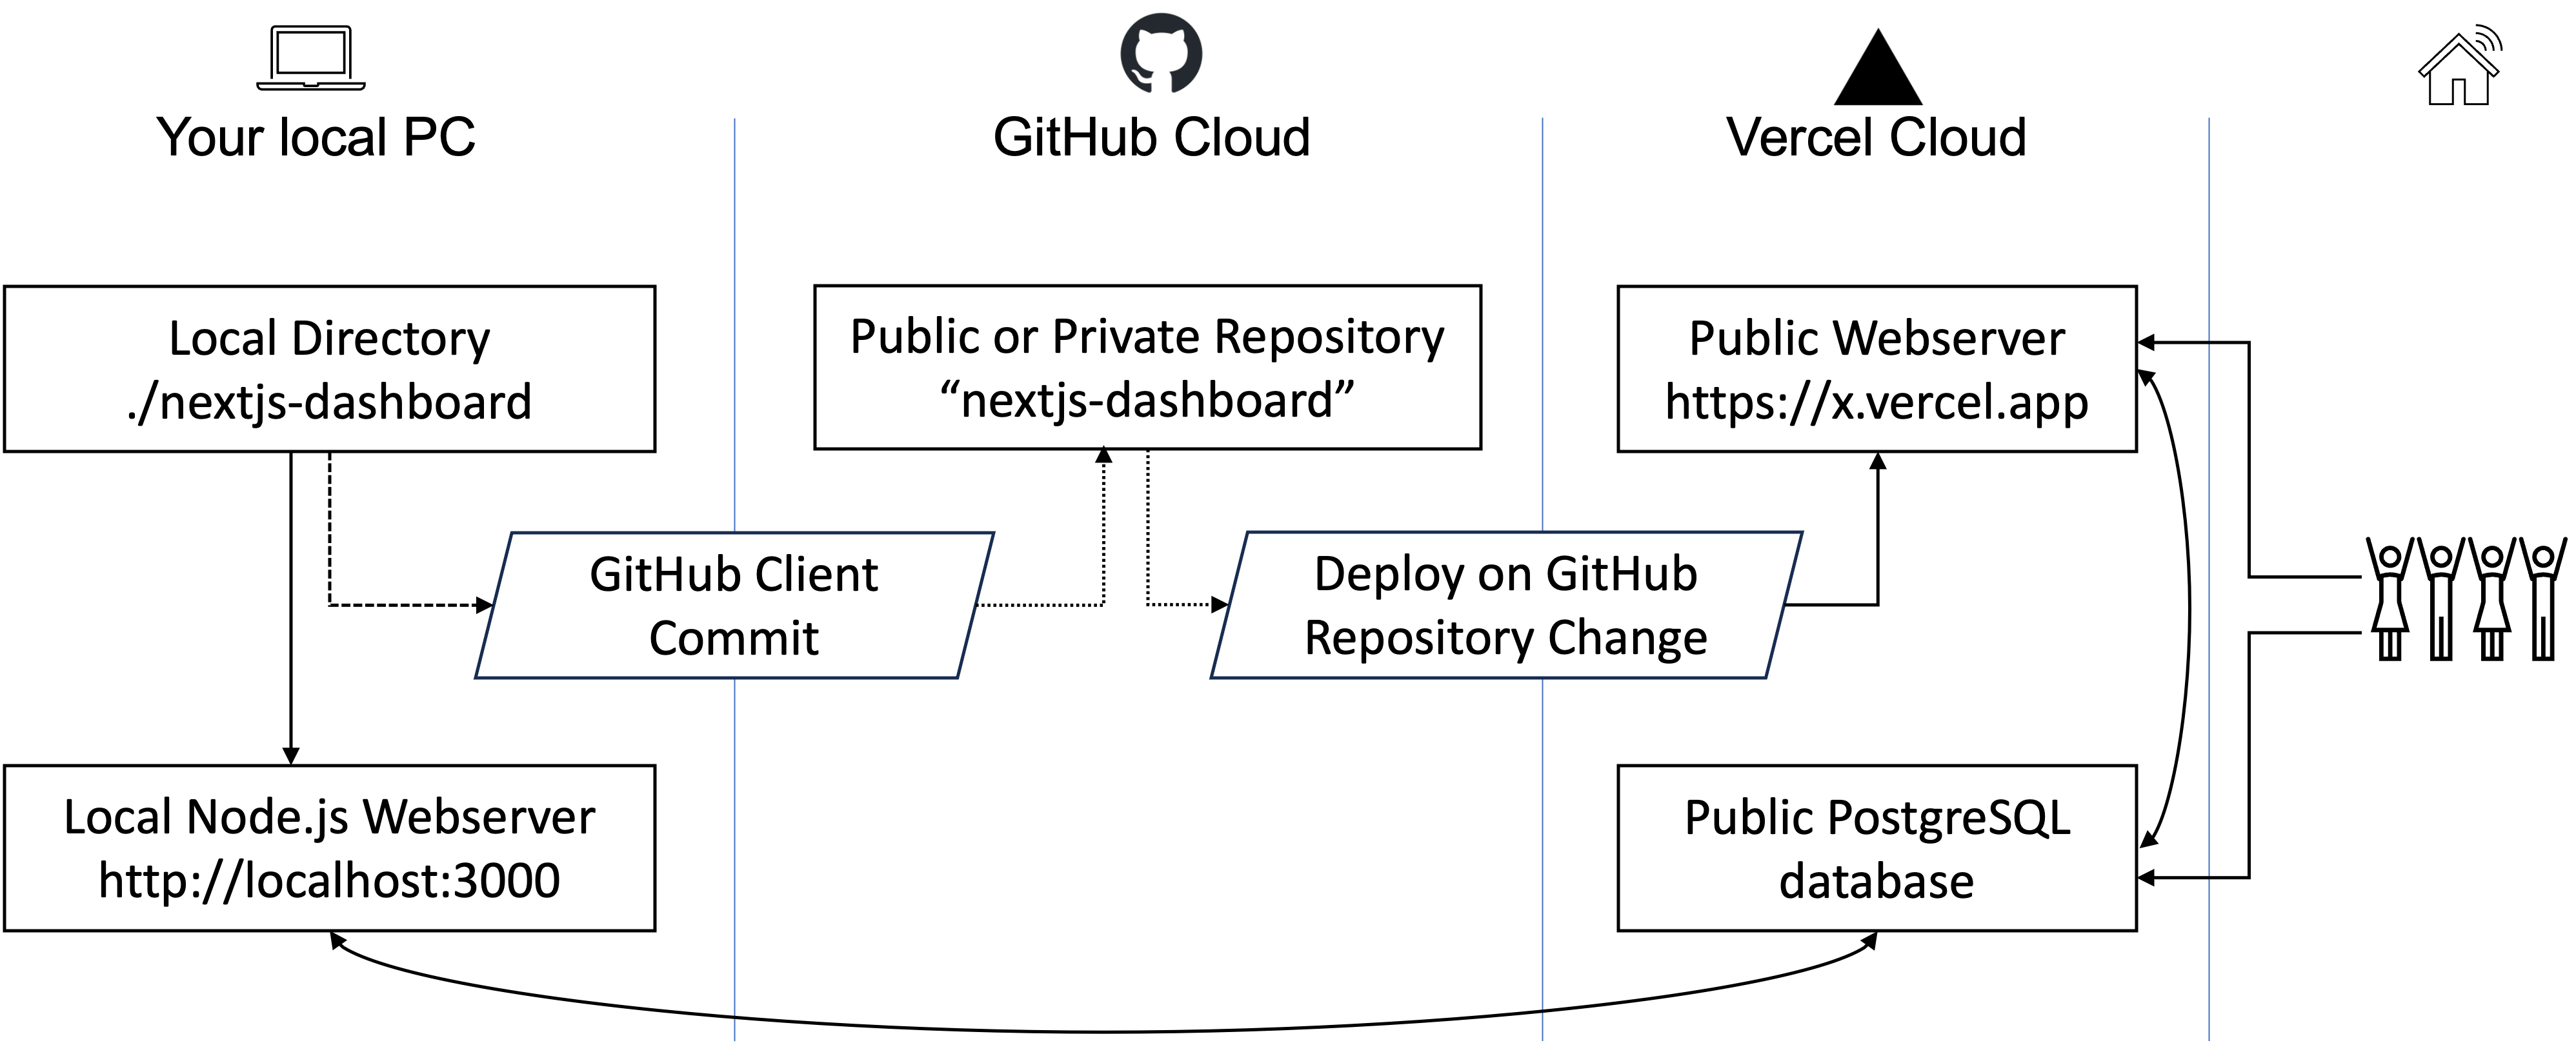
You have a local directory “nextjs-dashboard” somewhere on your local machine, where you can edit your code with your favorite IDE (I would recommend VS Code) and look at the result localy on your browser, because you also installed node.js on your client. Additionally, just like a professional, you commit your code to an GIT instance which is Microsoft’s popular GitHub in our case. Beside that you learned how to setup and configure Vercel’s offer of a database instance as well as a public webserver.
That already reveals some flaws and pain (at least in my stomach):
- You had to install node.js on your client and working with files directly part of your local file system
- node.js compiles everything depending on your clients architecture, but your production server most likely (will) run(s) on Linux.
- You have to rely on Vercel’s deployment and recompiling for production, which is not 100% transparent (at least to me).
- The database is reachable from the public internet (even if secured a bit)
- You literally use the same database for development and production purposes, which totally is not how it should be in a real-life example.
Summarized: The setup is not like it would be, if you are a (semi-)professional developer.
That was totally on purpose to keep the “Learn Next.js” tutorial as simple as possible, but will be changed by us, now.
Docker Containers?!
While in former articles I already wrote about the benefits of the Docker container infrastructure from the view of an administrator, it also brings big advantages for software developers. Even or especially large software companies rely on container architecture for software development, they just do not use Docker but Kubernetes which was designed by Google for running in big datacenters. Nevertheless, Docker provides most of the functionalities similar to Kubernetes and is absolutly fine for private developers as well as small(er) companies.
Install Docker on your PC
To install docker you can follow the well described tutorials on their website: https://www.docker.com/get-started/ . I recommend you to install the Docker Desktop App in case you are using Windows or Mac OS. In case you are using Linux i find it easier and much more leightweigth to install Docker via commandline, the same as you would do on a server. Once you have successfully installed Docker and the engine is running, it is time for the next steps.
Dockerize your Deveopment Area
In case you want to skip the Learn Next.js online course or you do not have
the resources of the result available, you can clone my Repository by
git clone https://github.com/handtrixx/nextjs-dashboard.git or by the GitHub Desktop App.
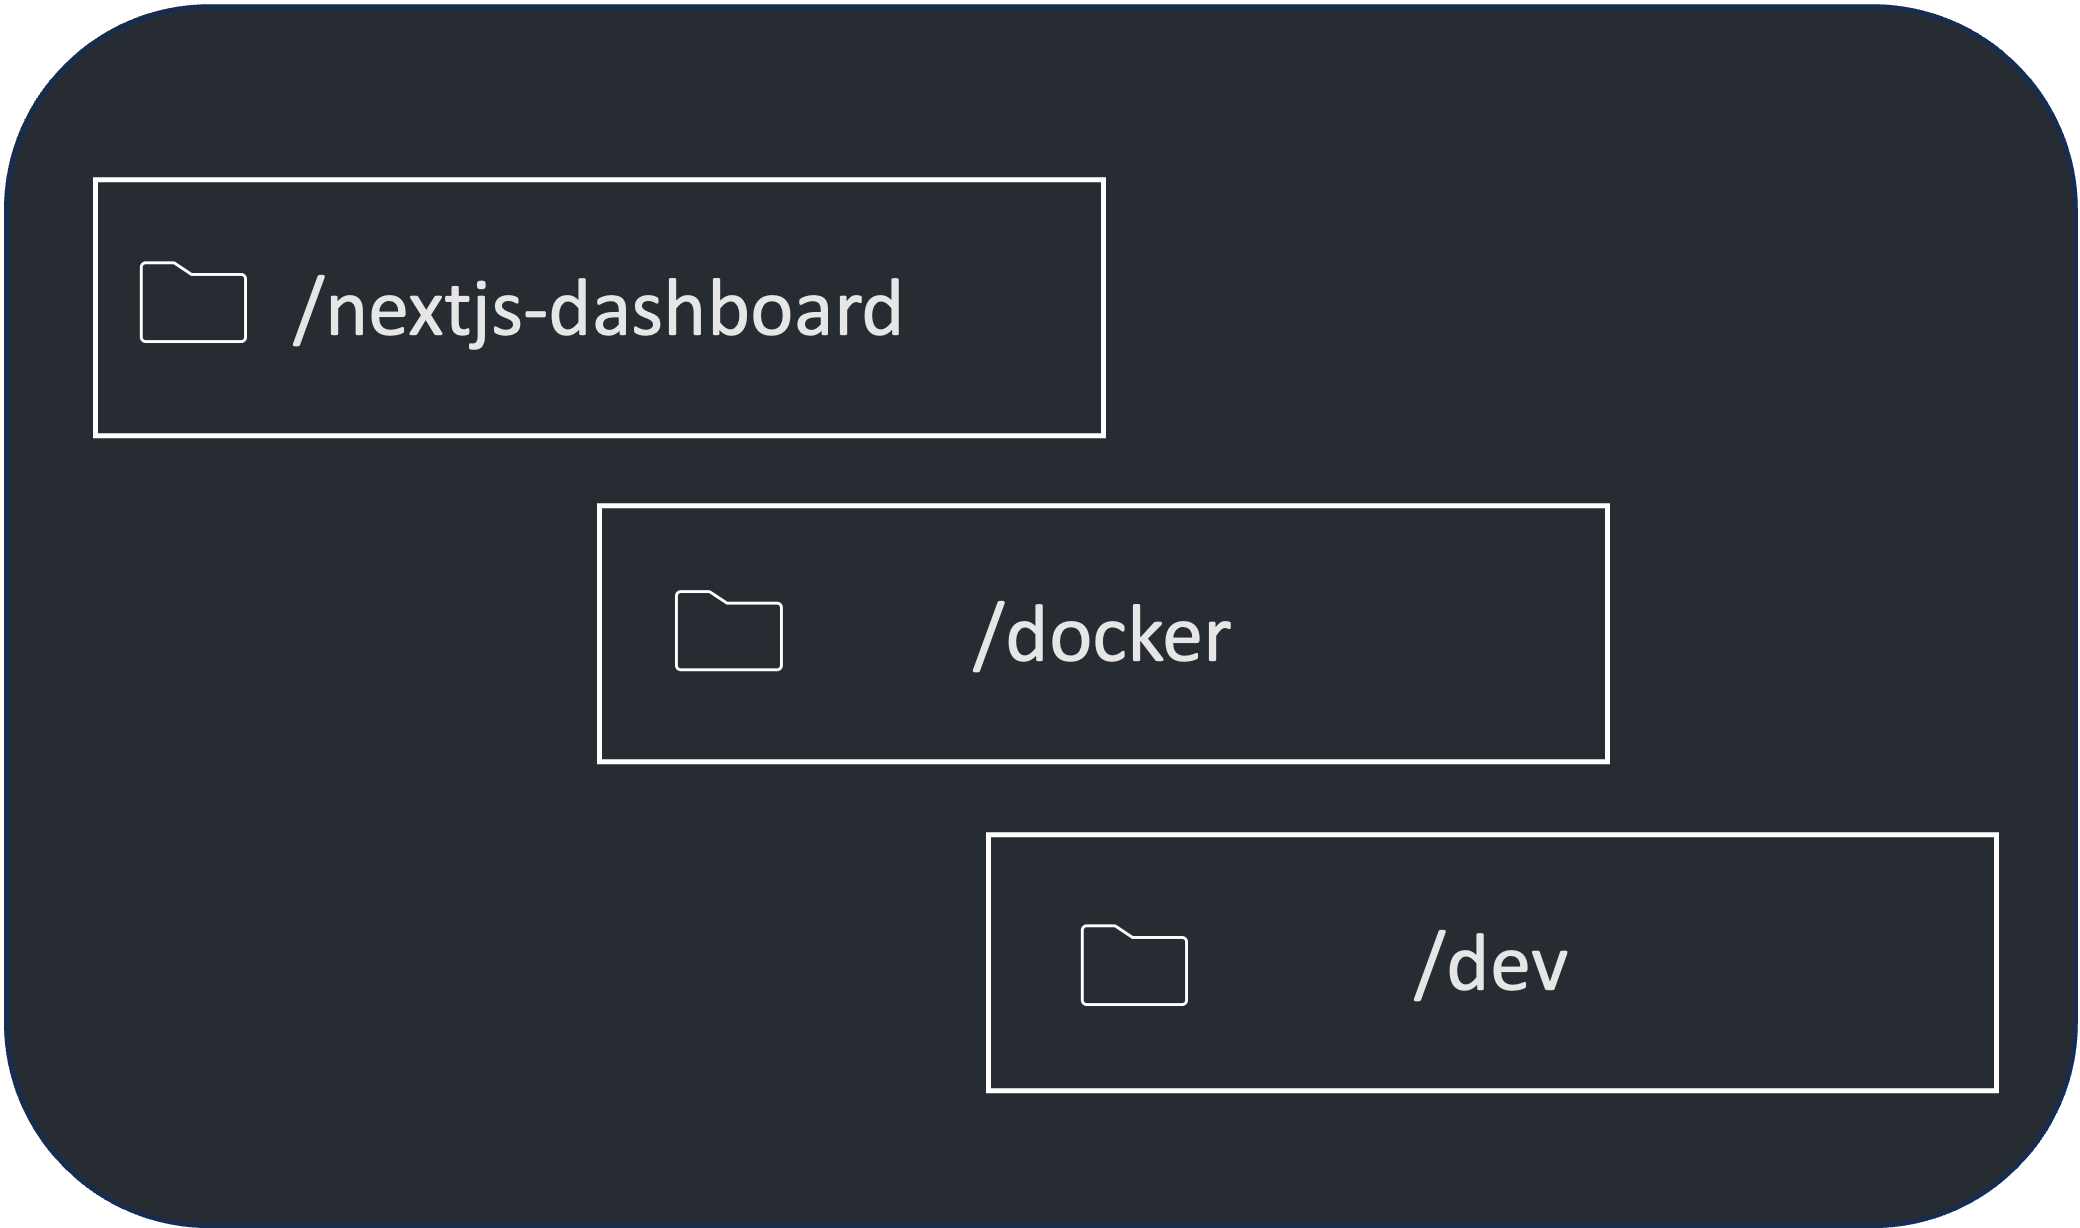
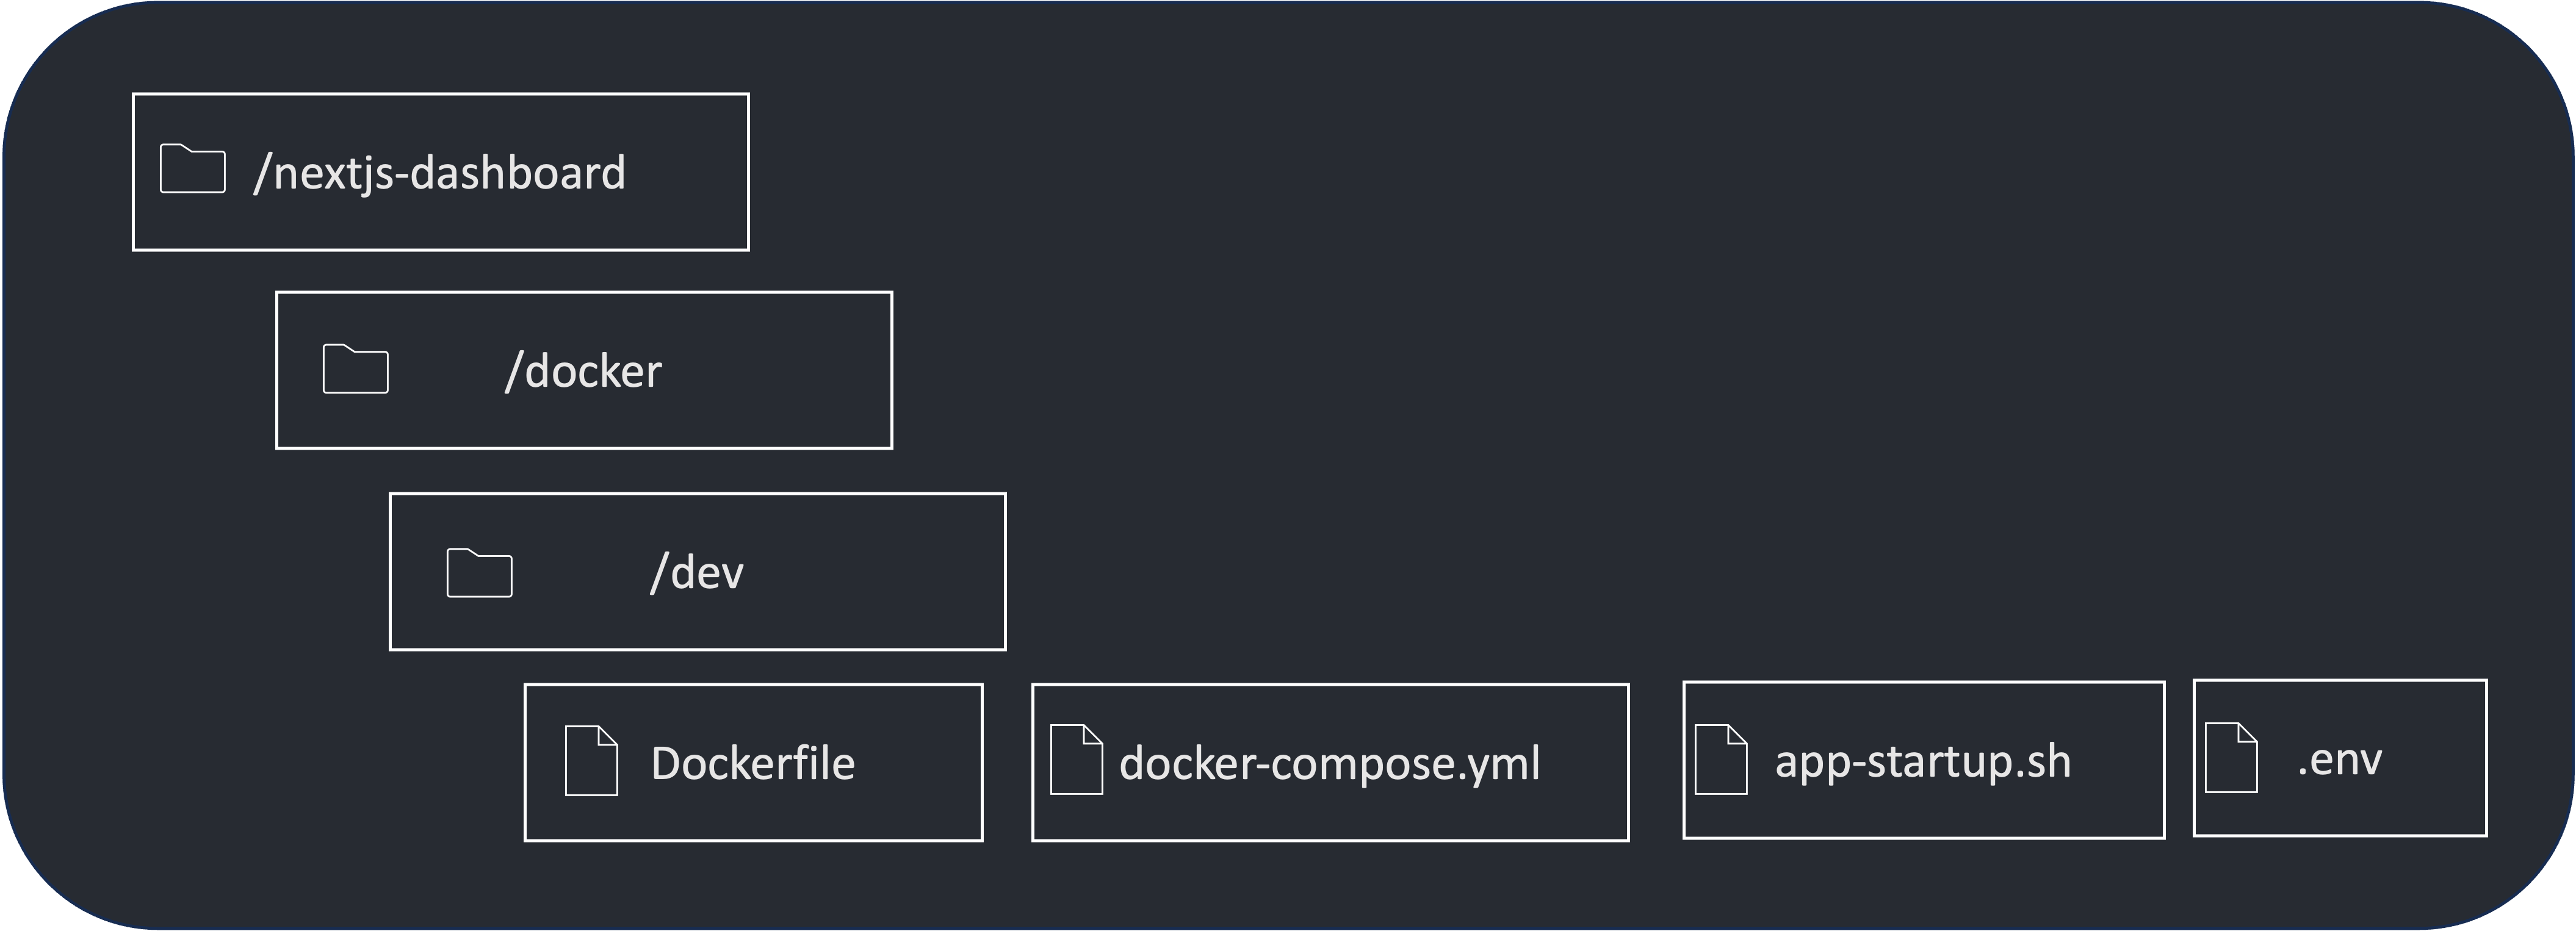
Then in your project’s root directory you create/enter folder “docker”. In folder docker we create/enter a subfolder called “dev”.
Inside the folder “dev” you create file “.env”:
1POSTGRES_URL="xxx"
2POSTGRES_PRISMA_URL="xxx"
3POSTGRES_URL_NON_POOLING="xxx"
4POSTGRES_USER="xxx"
5POSTGRES_HOST="xxx"
6POSTGRES_PASSWORD="xxx"
7POSTGRES_DATABASE="xxx"
8
9AUTH_SECRET=xxx
Please replace xxx by the values of your postgres database from Vercel. In case you don’t have one or do not want one leave the content like described here, just remember when you startup the app it will not be completly functional then, since there is no database connection.
Then inside the folder “dev” you create or open the file “Dockerfile” with following content:
 1# Use an official Node.js runtime as a base image
 2FROM node:latest
 3
 4# Update OS mostly to enjoy latest security updates
 5RUN apt-get update && apt-get upgrade -y
 6
 7# Set the working directory inside the container
 8WORKDIR /usr/src/app
 9
10# Copy the rest of the application code to the working directory
11COPY --chown=node:node ../../. .
12
13# update npm package manager if required
14RUN npm install -g npm
15
16# Copy the startup script to the container
17COPY --chown=node:node app-startup.sh /usr/src/app/app-startup.sh
18
19# Give execute permissions to the script
20RUN chmod +x /usr/src/app/app-startup.sh
21
22# set user to node
23USER node
24
25# Expose the port your app runs on
26EXPOSE 3000
27
28# Define the startup command
29CMD ["sh","/usr/src/app/app-startup.sh"]
What did we just do? At first the “Dockerfile” pulls the official node.js repository from the Docker Hub repository for further use. Then it installs the latest security and functional updates into our container. Then it copies the content of our projects directory into directory /usr/src/app inside the container. By “RUN npm install -g npm” the newest version of npm is installed. Then our startup script is copied and the user used inside the container for all of that is changed to “node” to reduce security flaws. At the end the file exposes our development port 3000 and instructs the system to start our startup script everytime the container will be launched.
The next step is to open/create the file “docker-compose.yml” in the same directory with following content:
 1services:
 2  nextjs-dashboard:
 3    build: .
 4    ports:
 5      - 3000:3000
 6    restart: unless-stopped
 7    volumes:
 8      - ../../:/usr/src/app/
 9      - ./app-startup.sh:/usr/src/app/app-startup.sh
10    networks:
11      - default
12    env_file:
13      - .env
Docker compose helps us to build up a real dev environment and later to additionally add a database server. For the time being the file contains the info to use the Dockerfile in the same directory to build our “nextjs-dashboard” service, exposes port 3000 to the host and would restart the service in case it crashed without manual intervention. On top of that, by the “volumes” are we specify that our complete project directory on the host is mapped inside the container at /user/src/app and does the same for our startup script. By defining network “default” it will create a encapsuled virtual network for the service as another layer of security. The last step by providing “env_file” is to forward the content ouf our “.env” file in the same directory as environment variables into the container.
We are nearly done, the last step is to open/create file app-startup.sh again in the same folder with following content:
1echo Installing node modules from package.json
2npm install --no-progress
3npm install next@latest --no-progress
4echo Starting your Node.js application
5npm run dev
6
7# Keep the script running in case of errors to be able to inspect the container
8tail -f /dev/null
The script runs every time you will startup the dev container and installs any missing node modules before starting the webserver. That’s it your file structure should now look like this:
Container Operations
While you can still use git like before to push your code to Github you have several other options to control your container. If you are inside your /dev folder, with
1docker compose up -d
your container will be build and strated for the first time. Any time you make changes of the docker-compose.yml file the same command will refresh and restart the configuration.
The command
1docker compose down
will shutdown your whole environment. While with
1docker compose logs
the log output including the console.log will be shown. And if you are not sure if you container is running or not you can test this with command:
1docker compose ps
In case you want to change/update your Dockerfile, after saving you have to run:
1docker compose build
2docker compose up -d
to make these changes active.
Summary
In this tutorial you successfully “dockerized” your development area, but maybe can’t already see big advantages beside that you do not have to install node.js and keep it up to date. That will change during the next tutorials when wie first add a database service to become independent from Vercels database instance, to divide dev and prd data and to increase security.