
Is there any reason to create your own Web Content Management System (WCMS)? There are already hunderds of them.
That’s true and because of that there is no obvious reason to start such a project. Just if we are not completly satisfied about what is currently available or we just want to learn and try out what it means to do so.
Originally I just wanted to redesign my website at https://niklas-stephan.de , but then I had fun to start from scratch and built up most of the backend on my own.
And that’s the intention behind nCMS, “niklas stephan’s Content Managment System” or “node-red Content Management System” or “not another Content Management System”.
What is nCMS and what is it capable of?
nCMS is a headless WCMS based on a flat-file hierachy, so in comparison to e.g. WordPress we do not use any database or any traditional server side programming language. Instead the backend utilizes my favorite Low-Code platform Node-Red, which is provided by a node.js instance. So our programming language for both, frontend and backend is pure JavaScript.
Changes in our backend code are deployed, like it is standard when using Node-Red. Additonal any changes not made directly in the Node-Red flow are based on files, which are synchronized and versionized in Github. Also the frontend is based on deployments, which are started externally via a webhook or manually inside the Node-Red flow. Once started the frontend deployment generates all files required and provides them as static files to a simple webserver of your choice.
In conclusion that makes a website created with nCMS extremly fast. To complete the story, it’s left to so say that if we want to create/edit a (new) post, we can use the markup language and edit the file via any text editor application.
Integrated features are (so far):
- Multi-Language Support for Posts and all other pages
- Comment Managend for each Post
- A simple Media Manager
- Frontend HTML generation based on Templates and Snippets
- Vanilla JavaScript only, no usage of any additional Framework like Vue or Angular by intention.
- Automatic creation of meta data required for social media and search engine integration.
- An internal Full-Text search functionality, that makes additional server calls obsolete.
- Publishing via simple meta attribute
And a lot more, documented and availabe at the projects Github repository: https://github.com/handtrixx/ncms
faster, cleaner and simplier than WordPress and similar?
Yes, yes, yes. I will try to explain here why and how that’s achieved.
Fast
- Backend – a sinlge deplyoments (the creation of all static files required for the frontend) duration is between 70 and 320 milliseconds.
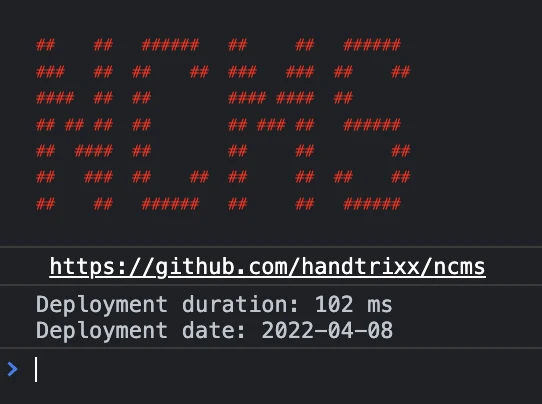
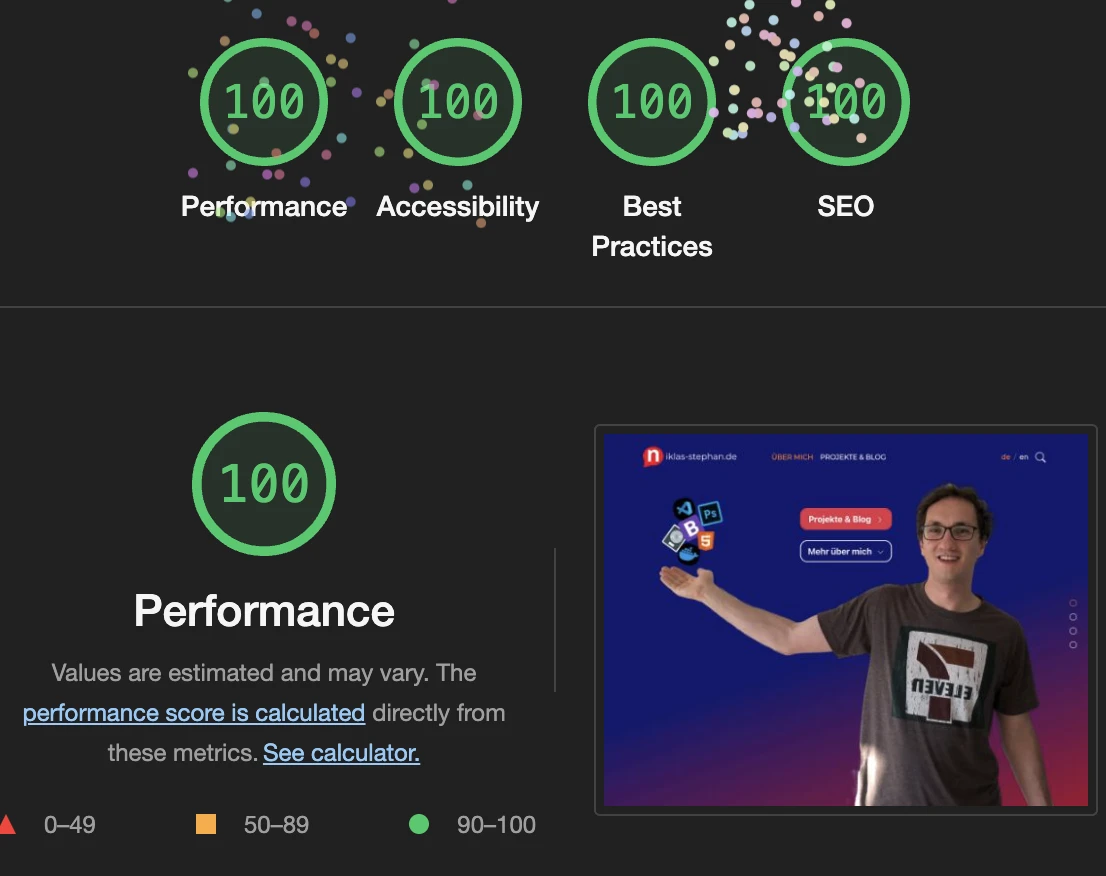
- Frontend – as an example, even by heavy usage of animations, images and other effects, the size of of the frontage of niklas-stephan.de is not more then 700KB and can be extremely fast provided as flat-files between 100 – 300 milliseconds.

Clean
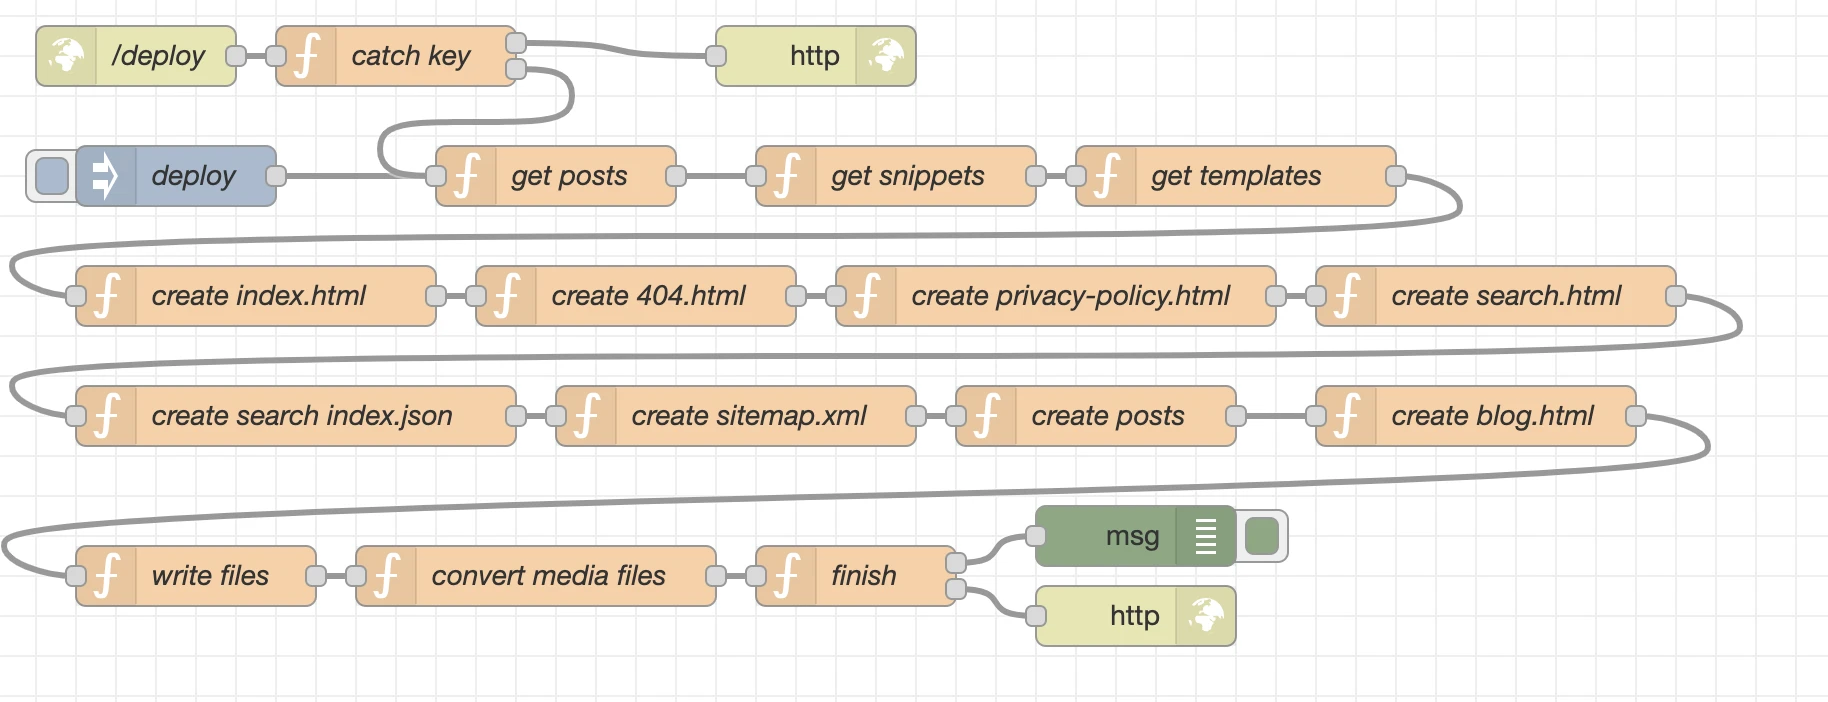
- Backend: Only overhead is the utilization of Node-Red, which on the other hand provides us a nice graphical overview of the complete program’s logic.
- Frontend: Since no additional frameworks are used, everything is quite simple and clean code is the result. While creating https://niklas-stephan.de , I additionally used the HTML5 templates from Bootstrap, but also that became much more clean and simple in its current version 5.
Simple
- Backend: To serve Assets, Media, Templates and Snippets a simple Editor like Visual Studio Code or similar can be used. Nice thing when using VS Code is, that it’s including SSH access to the server, GitHub Integration and File Manipulation capabilities. That more or less everything we need beside a Browser and a Photoshop (Clone like Pixelmator). In Node-Red we bring all sources together and extend the programs logic by further js code and usage of several node.js modules.
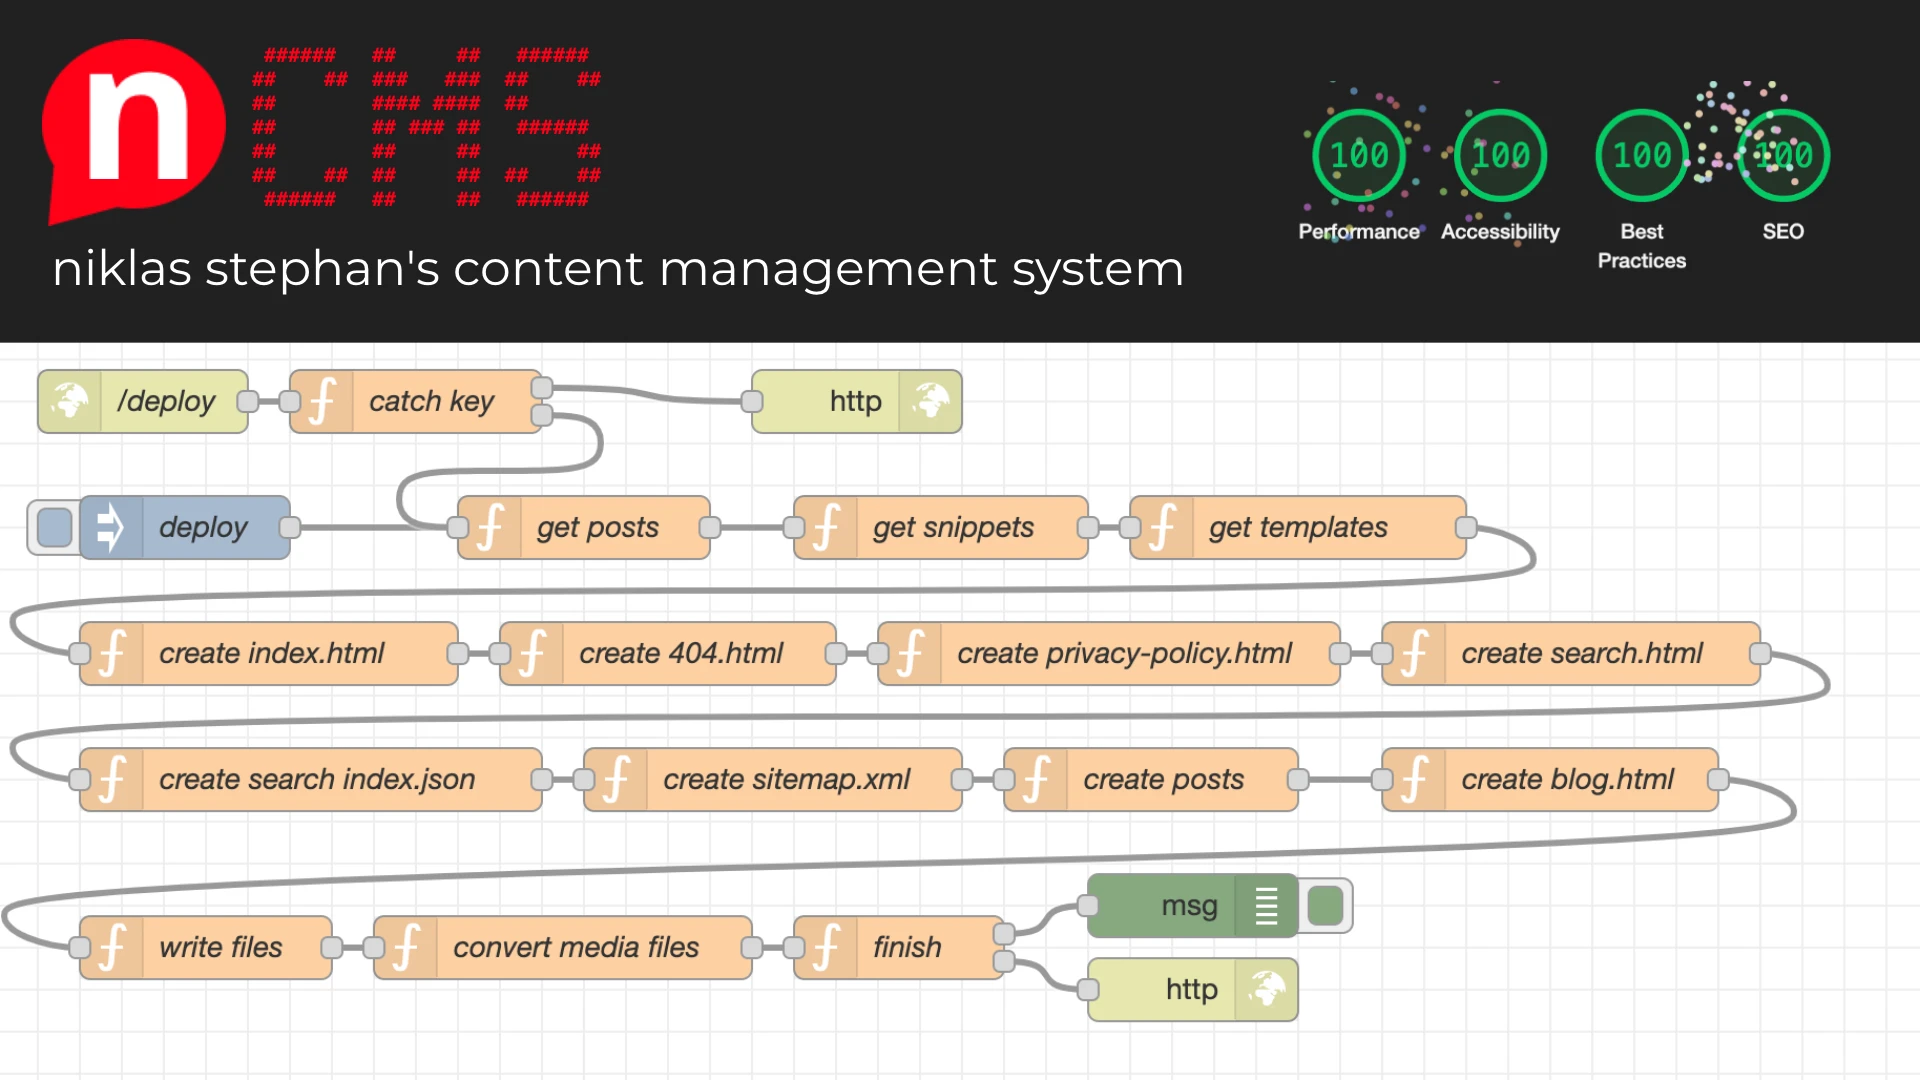
- Frontend: The selection of the language is done automatically but can be overwritten manual by click on the desired language on top of the screen. There is a front page, including links to the other areas like the search page, the data privacy and imprint page and the blog page. Beside that we have a 404 error page to catch calls to not (any longer) existing pages.
No need to mention that the frontend is optimized to be shown nicely on any kind of browser device.
Behind the scenes
A docker compose environment is used to host ncms. You can find the source content of volume src at https://github.com/handtrixx/ncms.
The contents of docker-compose.yml is shown here and based on the official Nod-Red image from Docker Hub (https://hub.docker.com/r/nodered/node-red):
version: "3.0"
services:
  ncms:
    container_name: ncms
    hostname: ncms
    image: nodered/node-red:latest
    restart: always
    environment:
      - TZ=Europe/Berlin
    networks:
      - dmz
    logging:
      options:
        max-size: "10m"
        max-file: "3"
    volumes:
      - ./data:/data
      - ./dist:/dist:rw
      - ./src:/src:rw
      - /etc/localtime:/etc/localtime:ro
networks:
  dmz:
    external: true
Not much to explain, since it’s relativly straigt forward. Maybe to mention are the diffrent volumes and the network configurataion. Just like most in my other web related posts, I use the nginx managment tool “Nginx Proxy Manager” as a reverse proxy (https://hub.docker.com/r/jc21/nginx-proxy-manager). The volume ./dist of our environment is direclty linked to the reverse proxy via symbolic link ln -s. So we do not have to copy or generate the files twice during the deployment and have the directly available without an additional web server instance.
The Node-Red GUI is made reachable by configuration at a separate subdomain.
File System setup
Directoy ./src includes following subfolders to be manually created:
- assets
- css
- fonts
- img
- js
- json
- md
- posts
- media
- x
- snippets
- templates
Folder assets and its subfolders holds all assets like the sources of Bootstrap 5 (https://getbootstrap.com/) and for sure our own css styles and javascript functions. Subdirectory json just contains our static translations.
Directory md and its subfolder posts contains our post files which are ending by an .md suffix.
Our Images and other media files are placed at folder media. I wrote the system to also check subfolders for files, but that currently on works down one level (so, content in a sub-sub folder will be ignored).
Later we will see these files will automatically converted to space saving and web-optimized format .webp and additonally also a thumbnail will be generated.
All HTML elements we want to use more than one time are stored in folder snippets.
Directoy templates contains the sources for all HTML pages where we include our snippets and other data during deployment later on.
If you would like to see the details about which files need to be created and what content they could contain, please checkout my Github repository at: https://github.com/handtrixx/ncms.
Templates
The template files are: 404.html – Our error page always shown in case a requested page simply does not exist or if a post maybe has not been translated yet. Our blog.html is used to provide an overview of all existing published posts, which can be filtered and sorted in several ways. The index.html simply contains our landing page with its content. A special role is assigned to the post.html file. It is used by each post as a template, to ensure all posts provide the same UX. privacy-policy.html instead is a simple template to provide the content of our privacy policy and the imprint which is required to be directly reachable from any page by EU law. The robots.txt template is used to provide search engine crawlers some basic infomration about our website. At last there is the search.html template which includes the locally indexed search functionality of the frontend.
Snippets
The so called Snippets are basic components which will be inserted to each template based page. They are separated to save time and keep our code clean. That way for example a change in the navigation snippet navbar.html is automatically reflected at all pages.
The used snippets are: footer.html, head.html, navbar.html, script.html.
node.js and Node-Red program backend logic
Nod-Red itself is based on node.js and a platform for low-code programming of event driven applications. We can use so called nodes which for example can represent a javascript function and then link many of these nodes as a flow.
For nCMS we nearly only use these capabilities but ignore the “low-code” part a bit, since we only work with full blown javascript functions.
What we do instead to integrate other npm modules into the specific nodes when required, which can be easily done via each nodes setup tab.
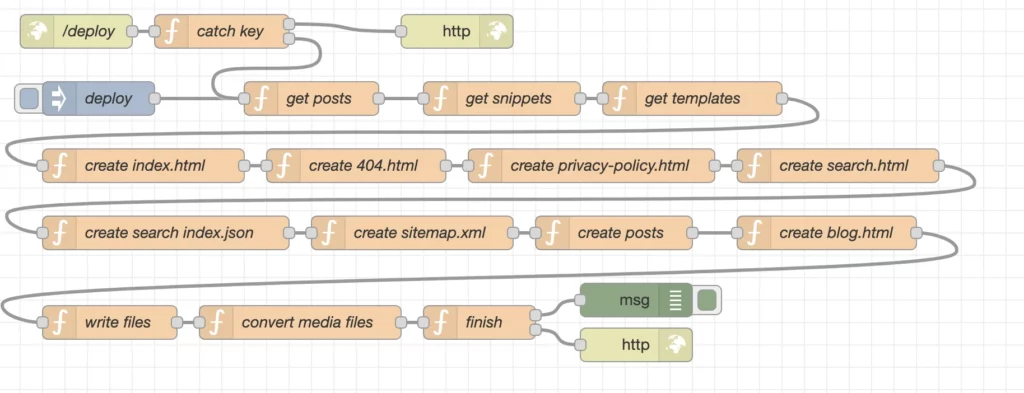
Here more detailed information about the created nodes and their details.
/deploy
The /deploy node is a simple http in which allows us to start our deployments by a webhook. That means by calling e.g. curl -X POST -d 'key=----' https://ncms.niklas-stephan.de/deploy from anywhere we start a request for a deplyoment.
catch key
For sure we don´t want to allow just anybody to start deployments, so the catch key node compares the “key” variable sent by the webhook call with a secret key stored in our backend we have stored in the data folder of our docker enviroment to be sure we do not accidently sync that key to Github as well.
As mentioned early we add an additioanl npm module fs-extra and make it availabel as fse at the setup tab of the node.
That allows us to access the containers file system to compare the keys.
The complete function in the node is:
const transferedKey = msg.payload.key;
const systemKey = fse.readFileSync('/data/deploy.key', 'utf8')

if (transferedKey == systemKey) {
    msg.payload = "Deployment Started";
    msg.statusCode = 200;
    msg.type = "webhook";
    msg.starttime = Date.now();
    return [null,msg];
} else {
    msg.payload = "Wrong authentication!"
    msg.statusCode = 400;
    return [msg,null];

}
There is to mention that this node has two exit paths. Exit one is used if the keys are matching and continues the deplyoment, while exit two is called if the authentication fails and will cancel the deplyoment.
deploy
The deploy node is for starting a deployment manually by click at the Node-Red GUI.
get posts
The 28 lines of the get posts node are enought to achieve a lot. The function will read all posts we have created and convert the markup into valid HTML. Also it additionaly manipulates the sources by modifying links, images and extracting the meta data stored in the .md files. Each output will be saved inside an array for later usage.
Beside the already known fs-extra npm packages we setup markdown-it and plugins for it.
markdown-it (https://github.com/markdown-it/markdown-it) is doing the magic of converting markup to HTML and the major reason why our own code is as simple as 28 lines can be.
msg.baseurl = "https://niklas-stephan.de"
msg.dist = {};
msg.posts = [];
const path = '/src/md/posts/';
const postfiles = fse.readdirSync(path)
const alength = postfiles.length;

for (var i=0; i<alength; i++) {
    var srcFile = path+postfiles[i];
    var distFilename = postfiles[i].split('.')[0]+".html";
    var srcContent = fse.readFileSync(srcFile, 'utf8')

    var md = new markdownIt({
        html: true,linkify: true,typographer: true,breaks: true})
        .use(markdownItFrontMatter, function(metainfo) {meta = JSON.parse(metainfo);})
        .use(markdownItLinkifyImages, {target: '_blank',linkClass: 'custom-link-class',imgClass: 'custom-img-class'})
        .use(markdownItLinkAttributes, { attrs: {target: "_blank",rel: "noopener",}
    });

    distContent = md.render(srcContent);

    let data = {"srcFile":""+srcFile+"","srcContent":""+srcContent+"","distContent":""+distContent+"","distFilename":""+distFilename+"",...meta};

    msg.posts.push(data)
}

return msg;
get snippets
Again we use the fs-extra module in our function, this time to read the content frorm each snippet to save it in our flow as array msg.snippets.
msg.snippets = {};
const path = '/src/snippets/';
const files = fse.readdirSync(path)
const alength = files.length;

for (var i=0; i<alength; i++) {
    var srcFile = path+files[i];
    var srcContent = fse.readFileSync(srcFile, 'utf8')

    msg.snippets[files[i]] = srcContent;
}

return msg;
get templates
And another time to do the same for the templates and to store them as objects at msg.templates.
msg.templates = {};
const path = '/src/templates/';
const files = fse.readdirSync(path)
const alength = files.length;

for (var i=0; i<alength; i++) {
    var srcFile = path+files[i];
    var srcContent = fse.readFileSync(srcFile, 'utf8')

    msg.templates[files[i]] = srcContent;
}

return msg;
create index.html
Now we can start to prepare our HTML files for output. First we go with index.html, where at first we generate and insert the pages specific meta data and then replace the placeholders of the template by the content of our snippets.
Also we set a page title to finally save the generated content as msg.dist.index which later will be used to write our index.html file.
msg.dist.index = "";
var ogmetalang = "de_DE";
var ogmeta = `
<meta property="og:type" content="website">
<meta property="og:locale" content="`+ogmetalang+`">
<meta property="og:site_name" content="niklas-stephan.de">
<link rel="canonical" href="`+msg.baseurl+`/index.html">
<meta name="description" content="Projekte und Posts aus der Welt von IoT, Musik und mehr">
<meta property="og:title" content="Projects & Blog - niklas-stephan.de">
<meta property="og:description" content="Projekte und Posts aus der Welt von IoT, Musik und mehr">
<meta property="og:url" content="`+msg.baseurl+`/index.html">
<meta property="og:image" content="`+msg.baseurl+`/assets/img/me_logo.webp">
<meta property="og:image:secure_url" content="`+msg.baseurl+`/assets/img/me_logo.webp">
<meta name="twitter:card" content="summary">
<meta name="twitter:description" content="Projekte und Posts aus der Welt von IoT, Musik und mehr">
<meta name="twitter:title" content="Projects & Blog - niklas-stephan.de">
<meta name="twitter:image" content="`+msg.baseurl+`/assets/img/me_logo.webp">`

msg.dist.index = msg.templates["index.html"].replace("<!-- html head from head.html snipppet -->",msg.snippets["head.html"]);
msg.dist.index = msg.dist.index.replace("<!-- Top Navigation from navbar.html snipppet -->",msg.snippets["navbar.html"]);
msg.dist.index = msg.dist.index.replace("<!-- footer navigation from footer.html snipppet -->",msg.snippets["footer.html"]);
msg.dist.index = msg.dist.index.replace("<!-- Javascript from script.html snipppet -->",msg.snippets["script.html"]);
msg.dist.index = msg.dist.index.replace("<!-- PAGE TITLE -->","Home");
msg.dist.index = msg.dist.index.replace("<!-- meta tags -->",ogmeta);

return msg;
create 404.html
The generation of our error pages content is done quickly. Again we insert the content of the snippets and set a page title.
All of that then can be used to write 404.html from msg.dist.errorpage later.
msg.dist.errorpage = "";

msg.dist.errorpage = msg.templates["404.html"].replace("<!-- html head from head.html snipppet -->",msg.snippets["head.html"]);
msg.dist.errorpage = msg.dist.errorpage.replace("<!-- Top Navigation from navbar.html snipppet -->",msg.snippets["navbar.html"]);
msg.dist.errorpage = msg.dist.errorpage.replace("<!-- footer navigation from footer.html snipppet -->",msg.snippets["footer.html"]);
msg.dist.errorpage = msg.dist.errorpage.replace("<!-- Javascript from script.html snipppet -->",msg.snippets["script.html"]);
msg.dist.errorpage = msg.dist.errorpage.replace("<!-- PAGE TITLE -->","Page not found");

return msg;
create privacy-policy.html
Same thing concerning the data privacy page which we provide as msg.dist.privacy object by following script.
msg.dist.privacy = "";

msg.dist.privacy = msg.templates["privacy-policy.html"].replace("<!-- html head from head.html snipppet -->",msg.snippets["head.html"]);
msg.dist.privacy = msg.dist.privacy.replace("<!-- Top Navigation from navbar.html snipppet -->",msg.snippets["navbar.html"]);
msg.dist.privacy = msg.dist.privacy.replace("<!-- footer navigation from footer.html snipppet -->",msg.snippets["footer.html"]);
msg.dist.privacy = msg.dist.privacy.replace("<!-- Javascript from script.html snipppet -->",msg.snippets["script.html"]);
msg.dist.privacy = msg.dist.privacy.replace("<!-- PAGE TITLE -->","Datenschutz & Impressum");

return msg;
create search.html
Before getting a bit more complex the simple generation of the msg.dist.searchindex object, which holds the content of our search page.
msg.dist.search = "";

msg.dist.search = msg.templates["search.html"].replace("<!-- html head from head.html snipppet -->",msg.snippets["head.html"]);
msg.dist.search = msg.dist.search.replace("<!-- Top Navigation from navbar.html snipppet -->",msg.snippets["navbar.html"]);
msg.dist.search = msg.dist.search.replace("<!-- footer navigation from footer.html snipppet -->",msg.snippets["footer.html"]);
msg.dist.search = msg.dist.search.replace("<!-- Javascript from script.html snipppet -->",msg.snippets["script.html"]);
msg.dist.search = msg.dist.search.replace("<!-- PAGE TITLE -->","Suche");

return msg;
create search index.json
Now we want to build up our search index, which as mentioned before, is created to allow our visitor to search our blogs content without starting individual server requests. To create that index as msg.dist.searchindex for writing at later as index.json we use a for loop which goes through all elements of msg.posts (our posts) and store them as json object.
var alength = msg.posts.length;
var index = "[";

for (var i=0; i<alength; i++) {
    index = index+`{"lang":"`+msg.posts[i].language+`","link":"/posts/`+msg.posts[i].distFilename+`","headline":"`+msg.posts[i].title+`","content":"`+msg.posts[i].distContent.replace(/[^a-zA-Z0-9]/g, ' ')+`"},`;
}
index = index.slice(0, -1);
index = index+"]";

msg.dist.searchindex = index;

return msg;
create sitemap.xml
Similar to the search index is the creation of our sitemap. Instead of a for loop here we use the forEach() function, which basically is doing the same but a bit more nice and modern in many aspects.
var xml = `<?xml version="1.0" encoding="UTF-8"?>
<urlset xmlns="http://www.sitemaps.org/schemas/sitemap/0.9" xmlns:xsi="http://www.w3.org/2001/XMLSchema-instance" xsi:schemaLocation="http://www.sitemaps.org/schemas/sitemap/0.9 http://www.sitemaps.org/schemas/sitemap/0.9/sitemap.xsd">
    <url>
        <loc>`+msg.baseurl+`/</loc>
        <priority>1.00</priority>
    </url>
    <url>
        <loc>`+msg.baseurl+`/index.html</loc>
        <priority>0.80</priority>
    </url>
    <url>
        <loc>`+msg.baseurl+`/blog.html</loc>
        <priority>0.80</priority>
    </url>`

msg.posts.forEach(postxml);

xml = xml + `
</urlset>`
msg.dist.sitemap = xml;
return msg;

function postxml(item) {
     if (item.published == true ) {
        xml = xml + `
        <url>
            <loc>`+msg.baseurl+`/posts/`+item.distFilename+`.html</loc>
            <priority>0.64</priority>
        </url>`
     }
}
create
While we already created the content of our posts and stored it at array msg.posts, we still need to extend them to add the snippets data as well as the social media tags to each one of them. Once done each post is available as an object in object msg.dist.posts.
msg.dist.posts = {};
var alength = msg.posts.length;
var data = "";
var ogmetalang = "";
var ogmeta = "";
var postdate = "";

for (var i=0; i<alength; i++) {

    if (msg.posts[i].language == "de") {
       ogmetalang = "de_DE"
    } else {
        ogmetalang = "en_US"
    }

    img = msg.posts[i].imgurl.split('.')[0]+".webp";

    ogmeta = `
    <meta property="og:type" content="website">
    <meta property="og:locale" content="`+ogmetalang+`">
    <meta property="og:site_name" content="niklas-stephan.de">
    <link rel="canonical" href="`+msg.baseurl+`/posts/`+msg.posts[i].language+`/`+msg.posts[i].distFilename+`">
    <meta name="description" content="`+msg.posts[i].excerpt+`">
    <meta property="og:title" content="`+msg.posts[i].title+`">
    <meta property="og:description" content="`+msg.posts[i].excerpt+`">
    <meta property="og:url" content="`+msg.baseurl+`/posts/`+msg.posts[i].language+`/`+msg.posts[i].distFilename+`">
    <meta property="og:image" content="`+msg.baseurl+`/media/full/`+img+`">
    <meta property="og:image:secure_url" content="`+msg.baseurl+`/media/full/`+img+`">
    <meta name="twitter:card" content="summary">
    <meta name="twitter:description" content="`+msg.posts[i].excerpt+`">
    <meta name="twitter:title" content="`+msg.posts[i].title+`">
    <meta name="twitter:image" content="`+msg.baseurl+`/media/full/`+img+`">`

    postdate = '<small class="c-gray pb-3" id="postdate">'+msg.posts[i].date+'</small>';

    data = "";
    data = msg.templates["post.html"];
    data = data.replace("<!-- html head from head.html snipppet -->",msg.snippets["head.html"]);
    data = data.replace("<!-- Top Navigation from navbar.html snipppet -->",msg.snippets["navbar.html"]);
    data = data.replace("<!-- footer navigation from footer.html snipppet -->",msg.snippets["footer.html"]);
    data = data.replace("<!-- Javascript from script.html snipppet -->",msg.snippets["script.html"]);
    data = data.replace("<!-- mardown content from posts -->",msg.posts[i].distContent);
    data = data.replace("<!-- Post Headline -->", msg.posts[i].title);
    data = data.replace("<!-- postdate -->", postdate);
    data = data.replace("<!-- Post Image -->", '<img src="/media/thumb/'+img+'" class="img-fluid mb-2" alt="postImage">');
    data = data.replace("<!-- PAGE TITLE -->",msg.posts[i].title);
    data = data.replace("<!-- meta tags -->",ogmeta);

    msg.dist.posts[msg.posts[i].distFilename] = data;
}

return msg;
create blog.html
Before being able to finally writing all the generated files to hard disk, we still need to take care of our blog page.
As you can see the function contains a little bit more action then most of the other functions.
Basically we loop through all posts to catch the categories defined in their meta data and store them as an array.
Then we remove any douplicate entries from that array. At the next step we assign a color to each category which are also defined in our frontend “style.css” file.
We also have to extract the Meta Data of each post to create their previews: the title, the description, the create date and the preview image. Here we also have an if statements to avoid not published posts will be considered.
The rest is as before, we set the meta data of the page and inject the data of the snippets to finally store all of that as object msg.dist.blog.
//get categories from all posts and extract unique ones
var categories = [];
for (var i=0 ; i<msg.posts.length;i++) {
    if (msg.posts[i].published == true) {
        for (var j = 0; j < msg.posts[i].keywords.length; j++) {
            categories.push(msg.posts[i].keywords[j]);
        }
    }
}
var uniqueCategories = [...new Set(categories)];

// define a color to stick for each category
const colorcat = {};
var catcolors = ["green", "red", "blue", "orange", "yellow", "pink", "purple","indigo"];
var c=0;
 for (const key of uniqueCategories) {
      colorcat[key] = catcolors[c];
      c = c+1;
 }

//generate and set html for categorie selection
var cathtml = "";
for (var k = 0; k < uniqueCategories.length; k++) {

    cathtml = cathtml + `<button data-filter=".cat-`+uniqueCategories[k]+`" type="button"
    onclick="sort()" class="btn bg-` + catcolors[k] + ` c-white me-2">` + uniqueCategories[k]+`</button>`;
}
msg.dist.blog = msg.templates["blog.html"].replace("<!-- CATEGORIES -->", cathtml);


// get card content from all posts and generate html
var posthtml = "";
for (var l = 0; l < msg.posts.length; l++) {
    if (msg.posts[l].published == true) {

    var link = msg.posts[l].filename.slice(0, -3)+".html";

    //get color for current post
    var postcolor = "";
    for (const key in colorcat) {
        if (key == msg.posts[l].keywords[0]) {
            postcolor = colorcat[key];
        }
    }

    imgurl = msg.posts[l].imgurl.split('.')[0]+".webp";


    posthtml = posthtml + `
    <div class="col-sm-6 col-lg-4 my-4 filterDiv cat-`+msg.posts[l].keywords[0]+` lang-`+ msg.posts[l].language + `">
        <span class="date hidden d-none">`+ msg.posts[l].date + `</span>
        <span class="name hidden d-none">`+ msg.posts[l].title + `</span>
        <div onclick="goto('`+ link+ `','blog')" class="card h-100 d-flex align-items-center bo-`+postcolor+`">
            <div class="card-header bg-`+ postcolor + `">` + msg.posts[l].keywords[0] + `</div>
            <div class="card-img-wrapper d-flex align-items-center">
                <img src="media/thumb/`+ imgurl + `"
                    class="card-img-top" alt="iot">
            </div>
            <div class="card-body">
                <h5 class="card-title">`+ msg.posts[l].title + `</h5>
                <p class="card-text">
                    `+ msg.posts[l].excerpt + `
                </p>
            </div>
            <div class="card-footer small text-center c-gray pdate">
                `+msg.posts[l].date+`
            </div>
        </div>
    </div>
    `;
    }
}

msg.dist.blog = msg.dist.blog.replace("<!-- POSTS -->", posthtml);

var ogmetalang = "de_DE";
var ogmeta = `
<meta property="og:type" content="website">
<meta property="og:locale" content="`+ogmetalang+`">
<meta property="og:site_name" content="niklas-stephan.de">
<link rel="canonical" href="`+msg.baseurl+`/blog.html">
<meta name="description" content="Projekte und Posts aus der Welt von IoT, Musik und mehr">
<meta property="og:title" content="Projects & Blog - niklas-stephan.de">
<meta property="og:description" content="Projekte und Posts aus der Welt von IoT, Musik und mehr">
<meta property="og:url" content="`+msg.baseurl+`/blog.html">
<meta property="og:image" content="`+msg.baseurl+`/assets/img/me_logo.webp">
<meta property="og:image:secure_url" content="`+msg.baseurl+`/assets/img/me_logo.webp">
<meta name="twitter:card" content="summary">
<meta name="twitter:description" content="Projekte und Posts aus der Welt von IoT, Musik und mehr">
<meta name="twitter:title" content="Projects & Blog - niklas-stephan.de">
<meta name="twitter:image" content="`+msg.baseurl+`/assets/img/me_logo.webp">`

msg.dist.blog = msg.dist.blog.replace("<!-- meta tags -->",ogmeta);
msg.dist.blog = msg.dist.blog.replace("<!-- html head from head.html snipppet -->",msg.snippets["head.html"]);
msg.dist.blog = msg.dist.blog.replace("<!-- Top Navigation from navbar.html snipppet -->",msg.snippets["navbar.html"]);
msg.dist.blog = msg.dist.blog.replace("<!-- footer navigation from footer.html snipppet -->",msg.snippets["footer.html"]);
msg.dist.blog = msg.dist.blog.replace("<!-- Javascript from script.html snipppet -->",msg.snippets["script.html"]);
msg.dist.blog = msg.dist.blog.replace("<!-- PAGE TITLE -->","Projekte & Blog");

return msg;
write files
Now, we want to write all the generated objects at msg.dist to files.
To do so the function “write files” is also using npm package fs-extraas fse.
After a general cleanup of target directoy /dist, to avoid any inconsistencies, we create the basic file structure.
By utilization of the “await” command we ensure the creation of those directories is finished before moving forward to the next steps.
Then we copy all of our assets from /src/assets/ to /dist/assets/, same as we do regarding the robots.txt file.
Last step is to create all the files and each post file, based on it’s objects name (key) by a loop, from msg.dist.
await fse.emptyDir('/dist').then(() => {
    fse.mkdirSync('/dist/media');
    fse.mkdirSync('/dist/media/full');
    fse.mkdirSync('/dist/media/thumb');
    fse.mkdirSync('/dist/posts');
});

await fse.copySync('/src/assets/', '/dist/assets/');
await fse.copySync('/src/templates/robots.txt', '/dist/robots.txt');

await fse.writeFileSync('/dist/index.html', msg.dist.index);
await fse.writeFileSync('/dist/blog.html', msg.dist.blog);
await fse.writeFileSync('/dist/404.html', msg.dist.errorpage);
await fse.writeFileSync('/dist/privacy-policy.html', msg.dist.privacy);
await fse.writeFileSync('/dist/search.html', msg.dist.search);
await fse.writeFileSync('/dist/sitemap.xml', msg.dist.sitemap);
await fse.writeFileSync('/dist/searchindex.json', msg.dist.searchindex);

const postfilefolder = "/dist/posts/"

await Object.entries(msg.dist.posts).forEach(item => {
  var [key, value] = item;
  fse.writeFileSync(postfilefolder+key, value)
});

return msg;
convert media files
A bit of complexity is also existing regarding our media files used mostly for posts. I wrote a small media manager which converts the source file in several output formats. That is done by create a thumbnail, a space saving .webp file and a copy of the original file from /src/media/ to /dist/media/thumb/, /dist/media/full/, /dist/media/orig. That is done for all files of type “.gif”, “.jpg”, “.jpeg” and “.webp”. All other files are just copied without thumbnail generation or conversion.
To do so we use npm modules fs-extra and sharp.
Additionally to mention is that we do not use await since file creation can take some seconds, which would lead to a longer depyloyment time. Instead these operations are running in background and continue after deplyoment is “officially” finished. That’s a bit tricky and maybe will be changed back in regular usage of nCMS.
var srcpath = '/src/media/';
var fullpath = '/dist/media/full/';
var thumbpath = '/dist/media/thumb/';
const filetypes = ["jpg", "jpeg", "png", "gif", "webp"];
const mediafiles = fse.readdirSync(srcpath);
const alength = mediafiles.length;
var mediafile = "";
var targetfile = "";

for (var i=0; i<alength; i++) {
    mediafile = mediafiles[i];

    if (mediafile.includes(".")) {
        targetfile = mediafile.split('.')[0];
        if (filetypes.includes(mediafile.split('.')[1]) ) {
            sharp(srcpath+mediafile)
            .toFile(fullpath+targetfile+'.webp');
            sharp(srcpath+mediafile).resize({ width: 440 })
            .toFile(thumbpath+targetfile+'.webp');
        } else {
            fse.copySync(srcpath+mediafile, fullpath+mediafile)
        }

    } else {
        var subsrcpath = srcpath+mediafile+"/";
        var subfullpath = fullpath+mediafile+"/";
        var subthumbpath = thumbpath+mediafile+"/";
        var submediafiles = fse.readdirSync(subsrcpath);
        var blength = submediafiles.length;
        await fse.mkdirSync(subfullpath);
        await fse.mkdirSync(subthumbpath);

        for (var j=0; j<blength; j++) {
            submediafile = submediafiles[j];
            subtargetfile = submediafile.split('.')[0];

            if (filetypes.includes(submediafile.split('.')[1]) ) {
                sharp(subsrcpath+submediafile)
                .toFile(subfullpath+subtargetfile+'.webp');

                sharp(subsrcpath+submediafile).resize({ width: 440 })
                .toFile(subthumbpath+subtargetfile+'.webp');
            } else {
                fse.copySync(subsrcpath+submediafile, subfullpath+submediafile)
            }
        }
    }
}

return msg;
finish
We are nearly done. at the “finsih” node we just calculate the duration of each deployment and create a timestamp.
Both information are written to file /dist/deploy.log, which is accessed by the frontend to show its data at the console log of the visitors browser.
Depending if the deployment is requested manually or via webhook, we output the results to both or just one of the following nodes.
var endtime = Date.now();
var duration = endtime-msg.starttime;
duration = duration;
let yourDate = new Date()
var depdate = yourDate.toISOString();

var log = "Deployment duration: "+duration+" ms \n";
log = log+"Deployment timestamp: "+depdate;
msg.statusCode = 200;

fse.writeFileSync('/dist/deploy.log', log);
msg.payload = log;

if (msg.type != "manual") {
    return [msg,msg];
} else {
    return [msg,null];
}
msg & http
Finally we are done. Both nodes “msg” and “http” just exist to have a clean ending of our deployment.
The “http out” is used to provide the deployment infos as feedback if the deployment was called via webhook.

While the “msg” debug node shows us the output of the msg object of our flow.
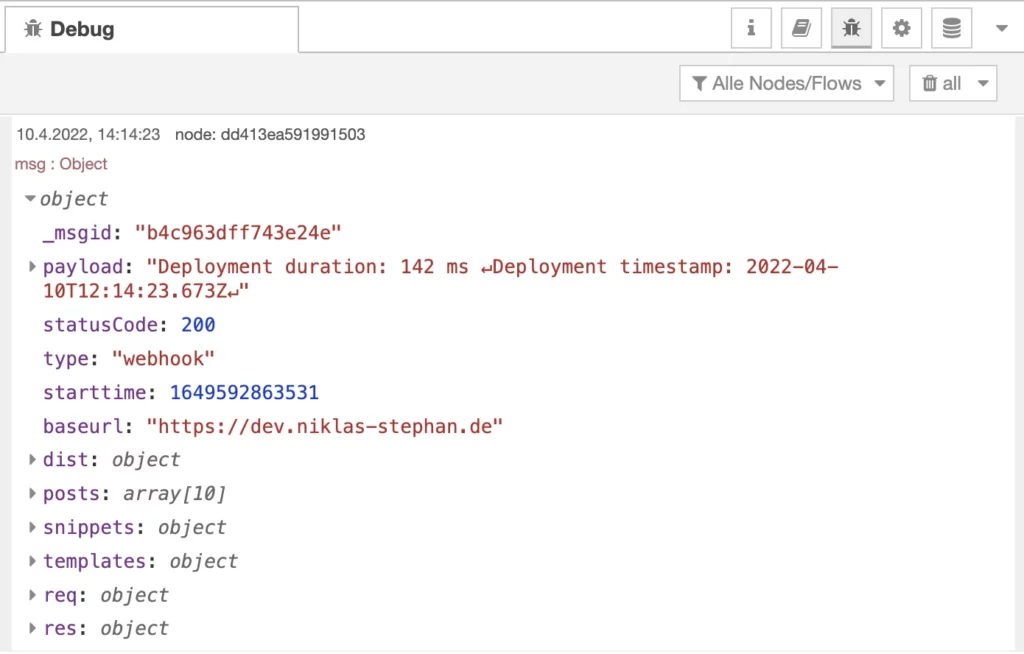
You can download the complete, and already a bit corrected/modified Node-Red flow here: https://niklas-stephan.de/media/orig/ncms/flow.json (Version 0.60).
Conclusion
I have to admit the whole project was a bit time consuming. But from start until the end I was driven and excited by the thought “just this one more little thing”. Additonally I had a lot of fun using Node-Red to create and optimize into more and more advanced functions. The integrated debugger and the nice GUI are extremly helpfull, to find errors and to keep overview at any time.
The, at least to me, new feature to easily utilize additional node.js modules inside my own functions made the trick for me. Otherwise I would have not been able to provide the same outcome or at least not that advanced and straight forward way it is, now.
If you every plan to do similar you are welcome to fork my project or to catch some ideas.
For sure nCMS is still not perfect.
For example all the references to the frontend inside my functions make it hard to read and understand for others.
Actually the fronted code and its functions, css and html has not really been mentioned in my post at all. Maybe I can do that another time.
Sources / Links
Here a summary of most of the sources, links and files I mentioned in my post:
- nCMS at Github: https://github.com/handtrixx/ncms
- Node-Red Flow used for nCMS: https://niklas-stephan.de/media/orig/ncms/flow.json
- The amazing Node-Red: https://nodered.org/
- Node-Red as Container at Docker Hub: https://hub.docker.com/r/nodered/node-red
- Ngnix Proxy Manager: https://nginxproxymanager.com/
- The Bootstrap HTML5 template created by Twitter: https://getbootstrap.com/
- markdown-it – Markup to HTML in an easy manner: https://markdown-it.github.io/
- file operations in node.js with fs-extra: https://github.com/jprichardson/node-fs-extra
- ultra fast image conversion in node.js with sharp: https://sharp.pixelplumbing.com/

Schreibe einen Kommentar